


Art Fair Display Ideas for Collectors: Gallery-Grade Setups
Three display approaches work for most residential and commercial interiors: an anchored gallery wall (one dominant piece plus supporting works at 2–3" frame-to-frame spacing), a single-anchor composition above furniture (optical center at 57–60" from the floor, art spanning roughly two-thirds the furniture width), and a ledge or salon-style rotation for dimensional, changeable arrangements. Those three cover nearly every wall type and collection size. For hardware, 3M Command Large Picture Strips handle frames under 16 lb without wall damage, Monkey Hook picture hangers work in drywall without anchors, and picture ledges give maximum flexibility for swapping pieces. Originals and ready-to-hang prints from Eman’s Gallery are sized and finished to suit all three approaches.
Key Takeaways
Measured planning, anchor-first sequencing, and conservation-aware placement are the three practices that separate a gallery-grade display from a decorative afterthought.
| Point | Details |
|---|---|
| Optical center height | Hang the arrangement’s center near average eye level from the floor, adjusted as needed for seating or ceiling height. |
| Spacing and span | Use 2–3" frame-to-frame for cohesion; art above furniture should span roughly two-thirds the furniture width. |
| Hardware by weight | 3M Command Strips for lighter frames; Monkey Hooks for drywall; screws into studs for heavy originals. |
| Light and preservation | Target high color rendering index lighting, aim fixtures around 30 degrees, and maintain stable moderate temperature and humidity levels for originals. |
| Emansgallery | Offers originals, canvas prints, and fine-art prints in display-ready sizes, with commissions available for custom sizing. |
Table of Contents
- How do you plan an art display before you hang anything?
- Which layout style fits your space and collection?
- What hanging hardware should you use, and how do you transfer templates to nails?
- How do you light artwork so the art leads, not the fixture?
- How do framing choices and dimensional objects affect a display?
- How do you protect originals and prints from light, humidity, and heat?
- How do you edit a wall so it reads purposeful, not cluttered?
- What is the exact hang sequence to follow on installation day?
- How do you adapt display ideas to different room types?
- How do you prepare walls and artwork surfaces before hanging?
- How do you integrate art display with existing interior design?
- Why planning beats impulse hanging
- Ready-to-hang originals and prints from Eman’s Gallery
- Sources
- FAQ
How do you plan an art display before you hang anything?
Planning on the floor prevents the most common mistakes: wrong scale, uneven spacing, and anchor pieces placed off-center. The method is straightforward. Lay all candidate frames on the floor inside a taped rectangle that matches your wall zone. Photograph the arrangement from directly overhead. That photograph becomes your reference throughout the hang.
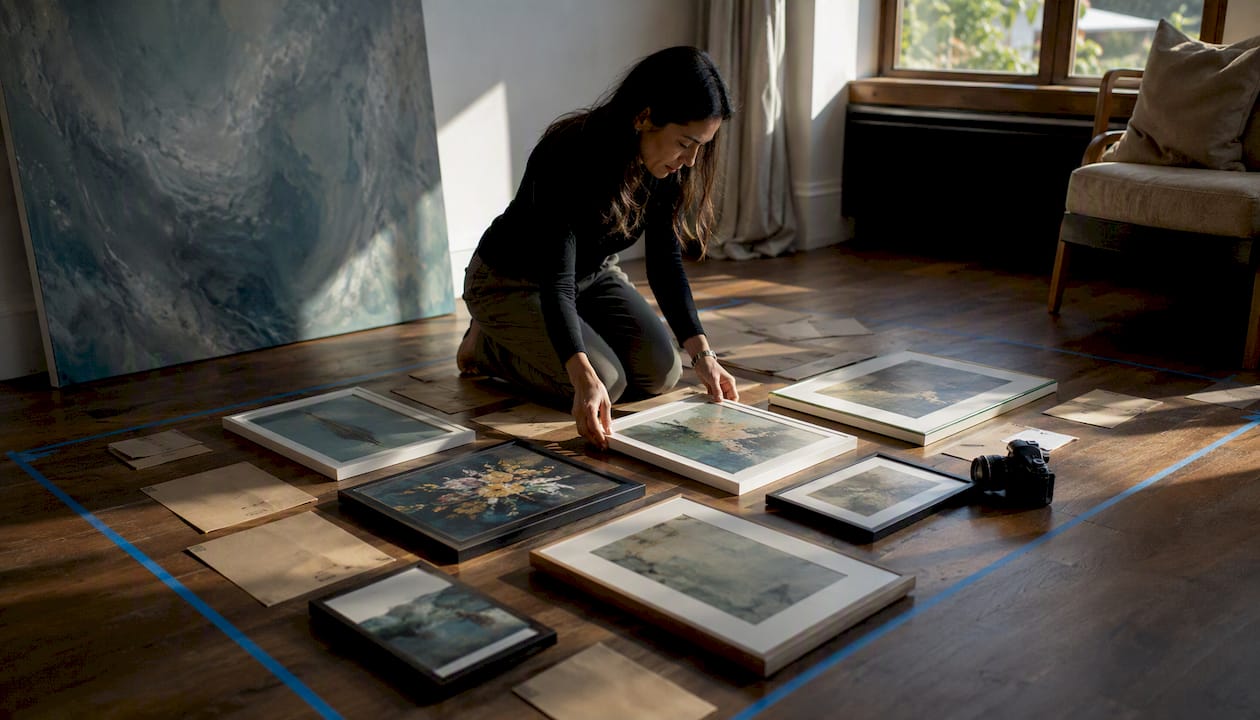
Next, trace each frame onto kraft paper, cut the templates, and label them with the piece’s name and hanging-hardware position. Tape the templates to the wall with painter’s tape. Step back, live with the arrangement for a day, then mark nail points through the paper.
| Measurement | Standard guidance |
|---|---|
| Optical center height | roughly eye level from floor |
| Art span above sofa | ~2/3 of sofa width |
| Frame-to-frame spacing (cohesive) | 2–3" |
| Frame-to-frame spacing (relaxed) | moderate spacing for a relaxed feel |
| Bottom of art to furniture top | a small gap for visual separation |
| Top of art to ceiling (8’ ceiling) | minimum breathing room above art |
The New York Times gallery-wall guide confirms this sequence: define zone, lay out on floor, trace templates, mark nails, hang anchor first, work outward. Optical center applies to the arrangement as a whole, not each individual frame.
Pro Tip: Photograph your floor layout from overhead before moving anything. Label each kraft-paper template with the piece name and the distance from the top edge to the hanging hardware. That measurement transfers directly to the wall.
Which layout style fits your space and collection?
Layout choice depends on the room’s character and the collection’s range of sizes. Here are the five most practical styles:
- Grid: Same-size prints in uniform rows. Best for photography series, botanical prints, or any collection where repetition is the point. Demands precise spacing.
- Salon/salon-style: Mixed sizes, mixed orientations, high visual energy. Works on large walls and stairwells. Anchor piece goes center or slightly above center.
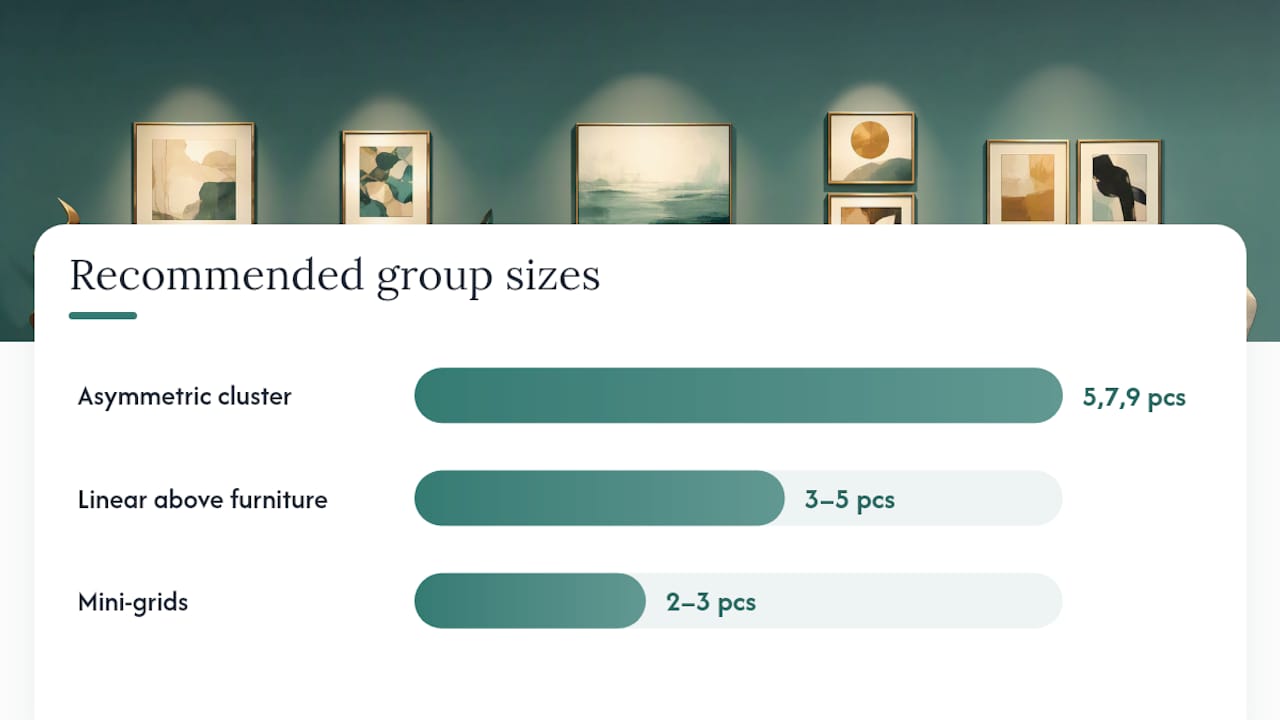
- Asymmetric cluster: Organic grouping that reads warm rather than formal. Suits living rooms and bedrooms. Odd-number groupings (5, 7, 9 pieces) read more naturally than even ones.
- Linear above furniture: A single horizontal row above a sofa, console, or bed. Clean, architectural. Limit to 3–5 pieces.
- Mini-grids: Small uniform sub-groups within a larger salon arrangement. Adds structure inside variety.
Designers currently favor mixing flat prints with dimensional objects: woven textile hangings, bas-relief ceramics, small sculptural shelves. Oak and walnut frames are replacing all-black walls as the dominant finish choice. Limit frame-finish families to one or two (black plus natural wood, or gold accent plus linen mat) so the wall reads as a single composition rather than a collection of individual decisions.
Pro Tip: Build small mini-grids of two or three same-size prints inside a larger salon arrangement. The sub-groups create visual anchors that prevent the overall wall from reading as chaotic.
For more on styling a gallery wall with real examples, Eman’s Gallery covers composition approaches in detail.
What hanging hardware should you use, and how do you transfer templates to nails?
Hardware choice follows weight and wall type.
- 3M Command Large Picture Strips: Frames under ~16 lb on smooth drywall or painted surfaces. No holes, removable. Check the package weight rating before use.
- Monkey Hook picture hangers: Push directly into drywall without a pilot hole. Rated for moderate weights; check manufacturer specs per hook.
- Screws into studs: For heavier originals and large-format canvases. Use a stud finder; do not rely on guesswork.
- Toggle anchors: For heavy works between studs on drywall. Match anchor type to wall material (drywall, plaster, masonry each require different anchors).
- Picture ledges: Single anchor screw, maximum flexibility for rotation. Ideal for collectors who swap pieces seasonally.
- Picture-rail or museum-rod systems: For serious collections. Continuous blocking (structural plywood sheathing behind drywall across the display zone) allows repositioning heavy works freely without re-drilling, per Ralston Architects’ collection design guidance.
Template-to-nail workflow: Measure the distance from the top of the frame to the hanging hardware on the back. Mark that distance on the kraft-paper template. Tape the template to the wall at the planned position. Push a nail or pencil through the template at the marked point. Remove the template and hang.
Pro Tip: For very large or very heavy works, consult a professional installer. Adhesive strips and standard drywall anchors have firm weight ceilings; exceeding them risks both the wall and the artwork.
How do you light artwork so the art leads, not the fixture?
Use aimable, high-CRI, controlled-beam fixtures so the artwork is the visual focus. Designer Richard Mishaan recommends aimable pin spots or adjustable track heads with beam control specifically to avoid glare and washout on the art surface.
For color-accurate display, target a CRI of 95 minimum; 97–99 for critical or collector-grade work. LED sources with low UV and IR output protect pigments over time. Aim fixtures at approximately 30 degrees from vertical to minimize long shadows on textured surfaces and reduce glare on glass-covered works. A dimming ratio of 5:1 (art lighting to ambient) creates gallery drama; 2:1 integrates more naturally into residential rooms.
For framed works behind glass, adjust beam angle until reflections disappear from the primary sightline. For textured paintings, side-angling the beam emphasizes surface texture without creating hot spots. Wall-mount picture lights such as the Foster LED Wall Mount by Crystorama or the Paxton One Light Wall Mount offer aimable, low-profile options suited to single-piece display.
How do framing choices and dimensional objects affect a display?
Frame selection shapes the entire wall’s register. Heavy frames with substantial profiles can carry a picture light mounted directly to the frame. Thin metal or wood frames read cleaner under ceiling or track lighting. Mats add breathing room around works on paper and signal gallery-quality presentation. Float mounts and shadowboxes lift the work off the backing, adding depth and a contemporary finish.
- Use mats for works on paper, photography, and prints under 20" on the longest side.
- Float-mount or shadowbox for textiles, dimensional objects, and mixed-media pieces.
- Limit frame finishes to one or two families across the entire wall.
- Introduce dimensional objects (woven hangings, small ceramics, sculptural shelves) as accent pieces, not as the majority of the wall.
Framebridge is a practical option for bespoke framing of prints and personal items at collector-appropriate quality without custom-shop lead times.
Pro Tip: When mixing dimensional objects with flat prints, assign the dimensional pieces to the outer edges or lower register of the arrangement. Centering them tends to fracture the composition.
How do you protect originals and prints from light, humidity, and heat?
Avoid direct sunlight on any original or print. UV radiation fades pigments and degrades paper and canvas over time, regardless of medium. For works on paper, UV-filter glazing or museum glass is the minimum standard. For unglazed canvases, placement matters more than any product.
Preservation checklist:
- Temperature: 68–72°F, with minimal daily fluctuation
- Relative humidity: 45–55% RH, stable
- Glazing: UV-filter glass or acrylic for works on paper and photography
- Wall placement: interior-facing walls, away from south- and west-facing windows
- Distance from heat sources: keep works away from HVAC vents, radiators, and fireplaces
- Backing: use acid-free backing boards for framed works on paper
Residential HVAC systems rarely hold the stability that collection-grade storage requires. For high-value originals in coastal or high-humidity climates, a conservator’s assessment of the display environment is appropriate. The Ralston Architects collection guide cites 68–72°F and 45–55% RH as the conservation reference range for display-grade environments.
How do you edit a wall so it reads purposeful, not cluttered?
Every piece must earn its place. The curator’s question is not “does this fit?” but “does this add something the wall currently lacks?” Start with the anchor piece, then add works that extend its color family, scale logic, or emotional register. Remove any piece that competes with the anchor for the same tonal or compositional space.
- 5–12 pieces works for most residential gallery walls.
- Over 15 pieces becomes hard to manage cohesively on a standard wall.
- Odd-number groupings read more naturally than even ones.
- Test every variation on the floor before committing to the wall.
Pro Tip: Hang the anchor piece alone and live with it for one week before adding supporting works. The emotional reaction over time is more reliable than any in-the-moment decision.
What is the exact hang sequence to follow on installation day?
- Measure the wall zone and confirm optical center height (57–60" from floor).
- Lay all frames on the floor inside a taped outline matching the wall zone.
- Photograph the floor layout from overhead.
- Trace each frame onto kraft paper; label with piece name and hardware distance from top edge.
- Tape templates to the wall; adjust until spacing and balance are correct.
- Mark nail or anchor points through each template.
- Remove templates; install hardware for the anchor piece first.
- Hang the anchor piece; verify optical center with a tape measure.
- Hang adjacent pieces working outward, checking spacing with a ruler after each.
- Final check: photograph from the primary sightline, step back, verify negative space is consistent.
Adjust by millimeters, not inches, at the final stage. A detailed hang checklist is available on Eman’s Gallery for reference.
- Verify each piece is level before moving to the next.
- Consistent negative space (2–3" for cohesion) matters more than perfect symmetry.
How do you adapt display ideas to different room types?
Living rooms with low sofas: lower the optical center to 54–56" so the arrangement reads at seated eye level. Dining rooms with high ceilings: raise the arrangement slightly and use larger-scale anchor pieces to fill vertical space without overcrowding. Hallways and stair runs: use a diagonal or linear arrangement that follows the stair pitch; keep consistent spacing on the horizontal axis. Bedrooms: smaller groupings (3–5 pieces) and softer lighting ratios (2:1 art to ambient) suit the lower-stimulation environment. Commercial spaces: grid arrangements and uniform framing read as intentional and professional; salon-style works in hospitality settings where warmth is the goal.
For displaying art in small spaces, a single large-scale piece often reads better than a crowded cluster.
How do you prepare walls and artwork surfaces before hanging?
Wall preparation:
- Fill existing holes with lightweight spackle; let dry fully (typically 2–4 hours for small holes).
- Sand patched areas smooth with 120-grit sandpaper.
- Prime patched spots with a PVA primer before repainting; skipping primer causes sheen differences.
- Clean the wall surface with a lightly damp cloth to remove dust and grease before applying adhesive strips.
Artwork surface preparation:
- Dust canvas surfaces with a soft, dry brush; never use water on unvarnished oil or acrylic paintings.
- Check hanging hardware on the back of each frame; tighten any loose D-rings or wire before hanging.
- For prints under glass, clean the glass with a lint-free cloth and glass cleaner before framing; fingerprints show under art lighting.
How do you integrate art display with existing interior design?
Art display works best when it responds to the room’s existing palette rather than competing with it. Pull one or two colors from the dominant artwork and repeat them in soft furnishings or accent objects nearby. A painting with warm ochre tones reads stronger against a warm white or linen wall than against a cool gray.
Frame finish should relate to existing metal tones in the room: brass hardware pairs with gold-accent frames; matte black fixtures pair with black or dark-wood frames. Avoid introducing a third metal family just for the art wall.
Scale matters as much as color. A single large-format canvas (36" × 48" or larger) anchors a room more decisively than four small prints at the same total area. For collectors integrating new acquisitions into furnished rooms, photograph the room and overlay the proposed arrangement digitally before purchasing frames or hardware.
Why planning beats impulse hanging
A measured, deliberate hang does more than prevent re-drilling. It determines whether a purchased work becomes a presence in a room or simply occupies wall space. Every original painting or print carries a specific scale logic, a color temperature, and a tonal weight. Placing it without accounting for those qualities wastes the work’s potential.
For collectors who commission originals, the conversation about placement should happen before the work is made, not after. Knowing the wall’s dimensions, the room’s lighting, and the existing palette allows the artist to calibrate scale, value, and color accordingly. That coordination is what separates a considered collection from an accumulation of purchases.
Ready-to-hang originals and prints from Eman’s Gallery

Eman’s Gallery offers original paintings, museum-quality canvas prints, and fine-art prints in sizes suited to the display approaches covered here, from single-anchor compositions to full salon walls. Works ship from fulfillment centers in the US, UK, and across Europe. Collectors who need custom sizing or specific color calibration for a room can inquire about commissions directly through the site. Each original by Eman Khalifa is one-of-a-kind; canvas prints are museum-grade and ready to hang. Browse current originals and prints at Emansgallery to find a piece scaled for your wall.
Sources
- 8 Tips for Lighting Art: How to Light Artwork in Your Home | Architectural Digest
- Art Collection Home Design Guide for Luxury Houses
- So You’ve Framed Your Art? Now Try Hanging a Gallery Wall.
- Gallery wall layout guide
- How to Make a Gallery Wall | Style by Emily Henderson
Professional installation is appropriate for very large or high-value works. For collections exceeding standard residential weight limits or requiring climate control, consult a professional art installer or conservator.
FAQ
What is the correct height to hang artwork?
The optical center of the arrangement should sit at 57–60" from the floor. For low sofas or seating areas, adjust down to 54–56".
How far apart should frames be on a gallery wall?
2–3 inches between frames creates a cohesive, curated look. 4–6 inches reads as more relaxed and suits larger walls with fewer pieces.
What hardware works best for a rental or no-damage display?
3M Command Large Picture Strips handle frames under 16 lb without holes. Picture ledges require one anchor screw and allow unlimited rotation.
How many pieces should a gallery wall have?
5–12 pieces works for most residential walls. Odd-number groupings (5, 7, 9) read more naturally than even ones.
Where can I buy ready-to-hang originals sized for a gallery wall?
Eman’s Gallery offers originals and canvas prints in display-ready sizes, with commissions available for custom dimensions. Browse at Emansgallery.
Stay Connected
- ✨ Explore Eman Khalifa's original art, fine art prints and art-inspired merchandise.
- Follow Eman Khalifa's art journey on: Instagram @emans_gallery and Facebook
- Watch Eman Khalifa creating live art on: YouTube @emans_gallery
